
Fee Category To The Classes Setup #
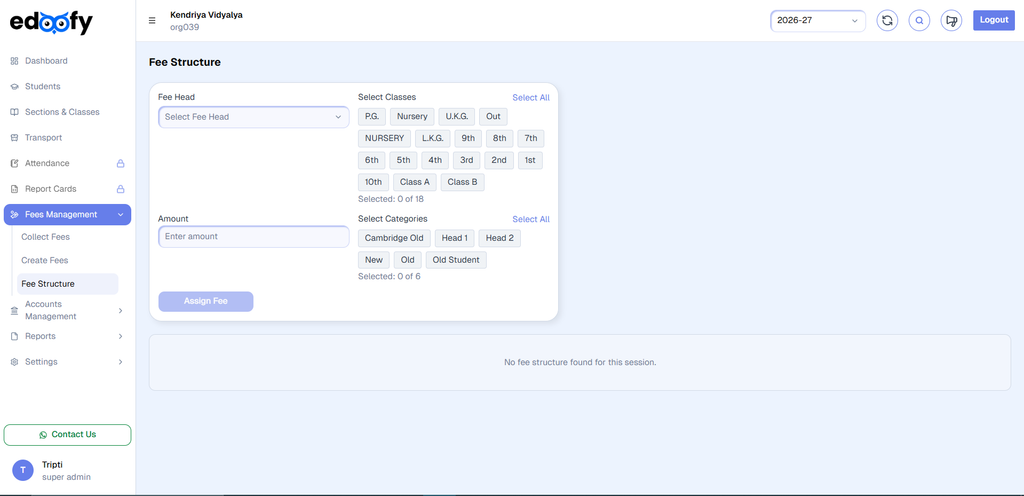
After creating your Fee Heads and Categories, assign the fee structure to the appropriate classes and student categories.
This defines the fee head, category, amount, frequency, and classes associated with each fee structure.
1. Open Fee Structure #
To begin assigning fees:
- Open Fee Management from the sidebar.
- Select Fee Structure.
- The Fee Structure page will open.
Here, you can create and manage fee structures for different classes and categories.
2. Select the Fee Head #
At the top of the Fee Structure section, locate the Fee Head field.
- Click the Fee Head dropdown.
- Select the fee head you want to configure.
For example:
Fee Head: Tuition Fees
The selected fee head will be used when creating the fee structure.
3. Select Classes #
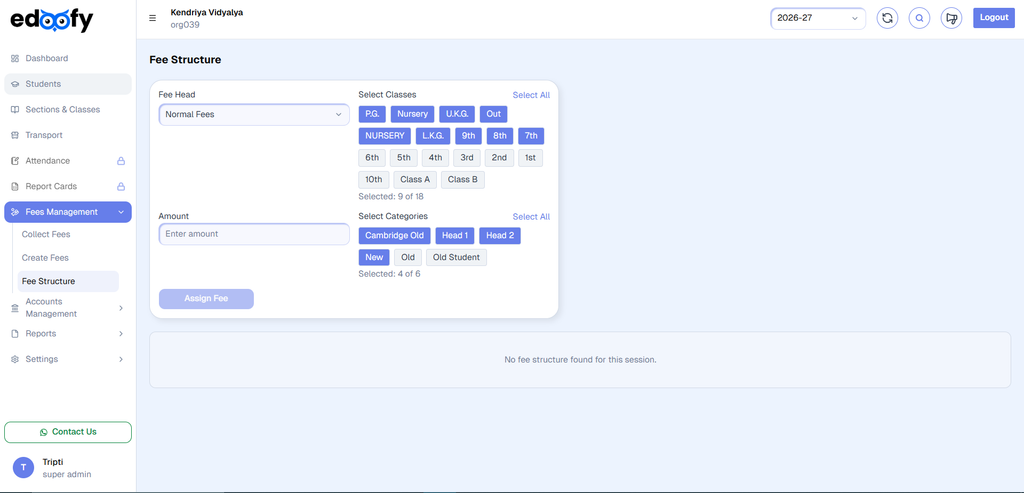
The Select Classes section lets you choose the classes to which the fee structure will be assigned.
Select individual classes or choose Select All to select every available class.
The available classes in the system include:
- Class 1
- Class 2
- Class 3
- Class 4
- Class 5
To select classes:
- Click the required class.
- The selected class will be highlighted.
- Select multiple classes as needed.
- Choose Select All if the fee structure applies to every class.
The system displays the number of selected classes below the class-selection options.
4. Select Categories #
Below the class-selection section, locate Select Categories.
The available categories may include:
- New
- Old
To select categories:
- Click the required category.
- The selected category will be highlighted.
- Select multiple categories as needed.
- Choose Select All to select every available category.
The system displays the number of selected categories below the category-selection options.
5. Enter the Fee Amount #
After selecting the required classes and categories:
- Locate the Amount field.
- Enter the fee amount to assign to the selected classes and categories.
For example:
Amount: ₹12,000
Verify that the amount is correct before assigning the fee.
6. Assign the Fee #
Before assigning the fee, make sure you have:
- Selected the Fee Head
- Selected the required Classes
- Selected the required Categories
- Entered the Fee Amount
Click the Assign Fee button.
The system will create the fee structure based on your selections.
7. View the Assigned Fee Structure #
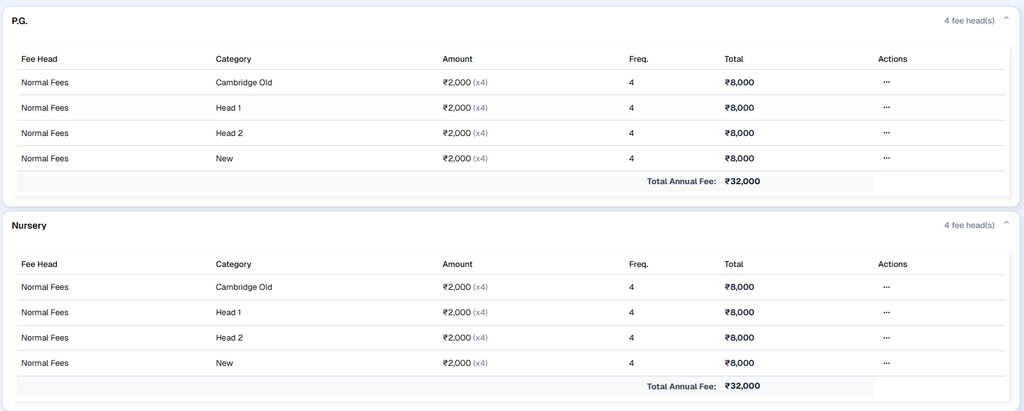
After you assign the fee, the created structure will appear below the Fee Structure form.
Classes are displayed as separate expandable sections.
For example:
- Class 1
- Class 2
- Class 3
- Class 4
- Class 5
Click a class to expand it and view its assigned fee details.
8. View Fee Details for a Class #
When you expand a class section, its fee details appear in a table.
The table contains:
| Field | Description |
|---|---|
| Fee Head | The fee type assigned to the class |
| Category | The student category to which the fee applies |
| Amount | The amount assigned to the category |
| Freq. | The fee frequency |
| Total | The calculated total fee |
| Actions | Available actions for the fee entry |
For example, a class may display:
Fee Head: Tuition Fees
Category: OLD
Amount: ₹12,000
Frequency: 12
Total: ₹144,000
The system also displays the Total Annual Fee for the class.
9. Assign Different Amounts to Different Categories #
The system allows you to configure different fee amounts for different student categories.
For example, you may have:
| Category | Fee Amount |
|---|---|
| old | ₹12,000 |
| new | Different applicable amount |
To configure different amounts:
- Select the required class or classes.
- Select the required category.
- Enter the applicable amount.
- Click Assign Fee.
- Repeat these steps for each category that requires a different amount.
The assigned categories will appear separately within the class’s fee structure.
10. Edit an Assigned Fee #
After creating a fee structure, you can modify an existing fee entry.
- Expand the required class.
- Locate the fee entry you want to modify.
- Go to the Actions column.
- Select the available edit option.
- Update the required fee information.
- Save your changes.
The updated fee information will appear in the class fee structure.
11. Delete an Assigned Fee #
If an assigned fee structure is no longer needed, you can delete it.
- Expand the relevant class.
- Locate the fee entry.
- Go to the Actions column.
- Select the Delete option.
- A confirmation message will appear.
- Confirm the deletion by clicking OK.
The fee entry will be removed from the class structure.
Important: Review the fee entry carefully before deleting it, especially if the fee structure is already being used for student fee management.
12. Fee Structure Setup Completed #
Once you have assigned the required fee heads, classes, categories, and amounts, your Fee Structure configuration is complete.
You can now use the configured structure to manage student fees according to each student’s class and category.
Recommended Setup Flow
Create Fee Categories → Create Fee Heads → Select Classes → Select Categories → Enter Amount → Assign Fee → Review Fee Structure
This completes the basic Fee Structure setup in Edoofy.


