
After setting up your Classes, Sections, Fee Categories, Fee Heads, Fee Structure, and Transport, the next step is to add students to the Edoofy School ERP system.
Edoofy provides a complete Student Admission form where you can enter the student’s personal, academic, contact, fee, transport, document, and other required information.
1. Open the Student Admission Form #
To begin adding a new student:
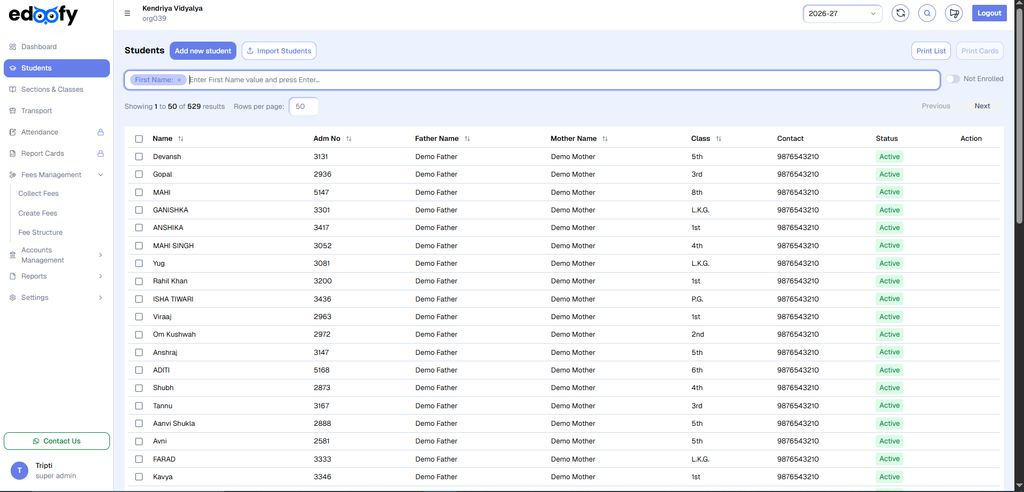
- Navigate to the Students section from the left-hand navigation menu.
- You will be redirected to the Students page.
- Click on the Add New Student button at the top of the page.
- The Student Admission form will open.
The admission form contains different sections for entering the student’s information.
2. Enter Basic Student Information #
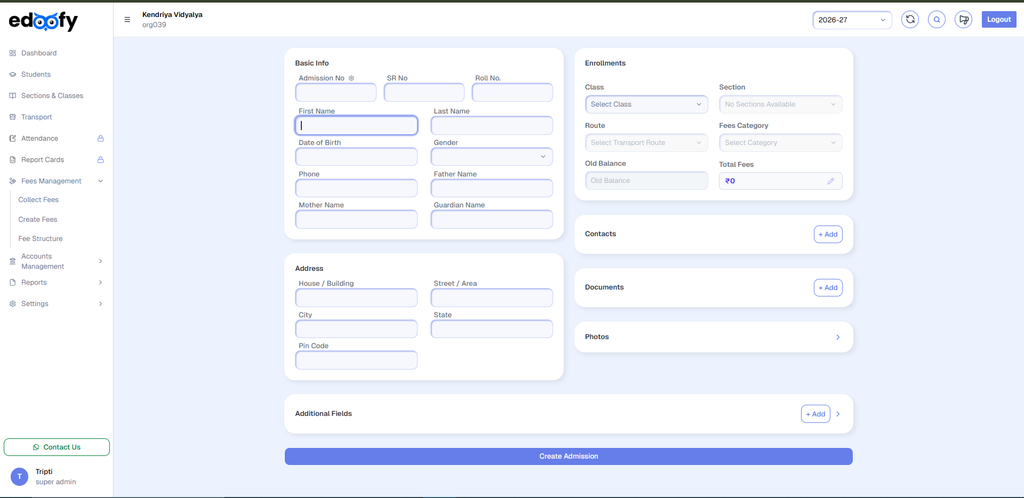
The Basic Info section contains the student’s primary personal information.
Enter the following details:
- First Name
- Last Name
- SR No.
- Date of Birth
- Gender
- Phone
- Father Name
- Mother Name
SR No.
The SR No. (Scholar Register Number) can be entered manually if it is not automatically generated.
Date of Birth
Select the student’s date of birth using the available calendar picker.
Gender
Select the appropriate option:
- Male
- Female
- Other
Make sure that the student’s personal information is entered correctly before moving to the next section.
3. Enter Student Address #
The Address section allows you to enter the student’s residential information.
Enter the following details:
- House / Building
- Street / Area
- City
- State
- Pin Code
The Pin Code should be entered as a 6-digit postal code.
Review the address carefully to ensure that the student’s residential information is accurate.
4. Configure Student Enrollment #
The Enrollments section is used to associate the student with the appropriate academic, transport, and fee information.
Select the following details:
Class
Select the student’s class from the available dropdown.
Example: Class 1
Section
Select the section assigned to the student.
Example: Section A
Route
If the student uses school transportation, select the appropriate transport route.
Example: Bus Route – 11
If the student does not use school transport, select the appropriate option according to your school’s configuration.
Fees Category #
Select the fee category applicable to the student.
For example:
- new
- old
Old Balance #
If the student has any outstanding balance from a previous term or academic period, enter the amount in the Old Balance field.
Based on the selected fee configuration and entered balance, the system will calculate and display the Total Fees.
Edit amount on admission
On clicking the pencil icon an overall fee structure overview will opened up.
On writing the total discount amount present at the top right input field all of the discounted amount will be applied to there respective installment.
you can directly waive off individual month’s amount as well or you can also apply the discount amount on the particular month’s installment as well.
5. Add Student Contacts
Edoofy allows you to add one or more contacts associated with the student.
To add a contact:
- Locate the Contacts section.
- Click + Add.
- Select the Relation of the contact.
Available relations may include:
- Father
- Mother
- Guardian
- Other
- Enter the contact’s:
- Name
- Phone
- Click + Add again if you want to add another contact.
You can add multiple contacts for a single student as required.
6. Add Student Documents #
You can upload identification and academic documents associated with the student.
To add a document:
- Locate the Documents section.
- Click + Add.
- Select the Owner of the document.
The owner can be:
- Student
- Father
- Mother
- Guardian
- Enter the Document Type.
Example: Aadhar Card
- Enter the Document Number.
- Click Choose File.
- Select the corresponding document from your computer.
The uploaded document will be associated with the student’s admission record.
7. Upload Student and Parent Photos #
The admission form also allows you to upload profile photographs for the student and their associated contacts.
You can upload photos for:
- Student
- Father
- Mother
- Guardian
To upload a photo:
- Locate the respective photo section.
- Click Choose File.
- Select the required image from your computer.
Make sure that the correct photograph is uploaded for each person.
8. Add Custom Fields #
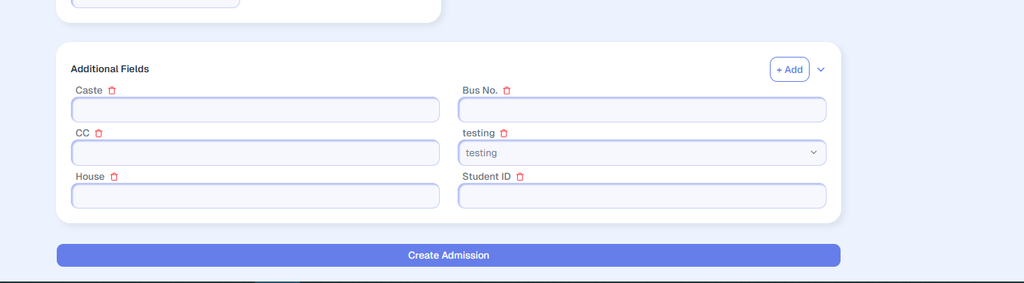
Edoofy allows administrators to create Additional Fields to capture information specific to their school.
This is useful when the standard admission form does not contain a particular field required by your institute.
Create an Additional Field
- Scroll down to the Additional Fields section.
- Click + Add.
- Enter the Label for the new field.
Example:
Blood Group
- Select the required field type from the Text dropdown.
Available field formats include:
- Text / Number
- Select
- Checkbox
- Radio
9. Configure Custom Field Types #
Text / Number
Use this field type for standard text or numerical information.
Examples:
- House Number
- Siblings
- Identification Number
Select
Use the Select option when you want to provide predefined choices in a dropdown.
For example, for a Blood Group field, you can add:
- A
- B
- AB
- O
Enter each option and press Enter to add it.
Checkbox / Radio
Use these options when the information requires a yes/no selection or a choice between multiple options.
Examples:
- Direct Admission?
- Entrance Exam
- Previous School
You can also mark a custom field as:
- Required
- Unique
Once the field has been configured, click Save Fields.
The newly created field will then become available in the admission form.
10. Fill the Additional Fields #
After creating the required custom fields:
- Locate the newly created fields in the admission form.
- Enter or select the appropriate information for the student.
- Make sure all Required fields have been completed.
- Verify the information before proceeding.
11. Complete the Admission #
Once all the required student information has been entered:
- Review the complete admission form.
- Verify the student’s personal, academic, fee, transport, contact, and document information.
- Scroll to the bottom of the form.
- Click Create Admission.
Edoofy will process the admission and create the student’s record.
12. Send WhatsApp Welcome Message #
After the admission is successfully created, an Admission Successful! confirmation will appear.
The system also provides an option to send a WhatsApp welcome message.
To send the message:
- Select the required recipient from the Select WhatsApp Number dropdown.
- Available options may include:
- Primary Phone
- Father’s Phone
- Mother’s Phone
- Review the automatically generated welcome message.
- Click Send Message to send the notification.
If you do not want to send the WhatsApp message, click:
Done (Skip Message)
The admission will still be completed successfully.
13. Verify the Student Profile #
After completing the admission process, you will be redirected to the Students list.
To verify the newly created student:
- Use the Search bar at the top of the student list.
- Enter the student’s name.
- Locate the newly admitted student.
- Click on the student’s row.
The Student Details panel will open on the right side of the screen.
Here, you can review the student’s information, including:
- Student Details
- Fee Plan
- Contacts
- Documents
- Transport Mode
Review the information to ensure that the student’s admission record has been created correctly.
14. Admission Completed #
Once the student has been successfully created and verified, the admission process is complete.
The student’s record is now available in Edoofy and can be managed through the Students module.
Student Admission Flow
Students → Add New Student → Basic Information → Address → Enrollment → Fee & Transport Details → Contacts → Documents → Photos → Additional Fields → Create Admission → WhatsApp Notification → Verify Student Profile
This completes the Student Admission process in Edoofy.


