
Overview
The Filters and Searches feature in Edoofy School ERP enables administrators to quickly locate, filter, and manage specific records across various modules, including Students, Fee Collection Reports, Fee Due Reports, Day Book Reports, and Demand Reports.
It provides multiple filtering options, such as multi-criteria search tags, date range selection, numeric range sliders, and pagination controls. Administrators can also print or export filtered results for reporting and record-keeping purposes.
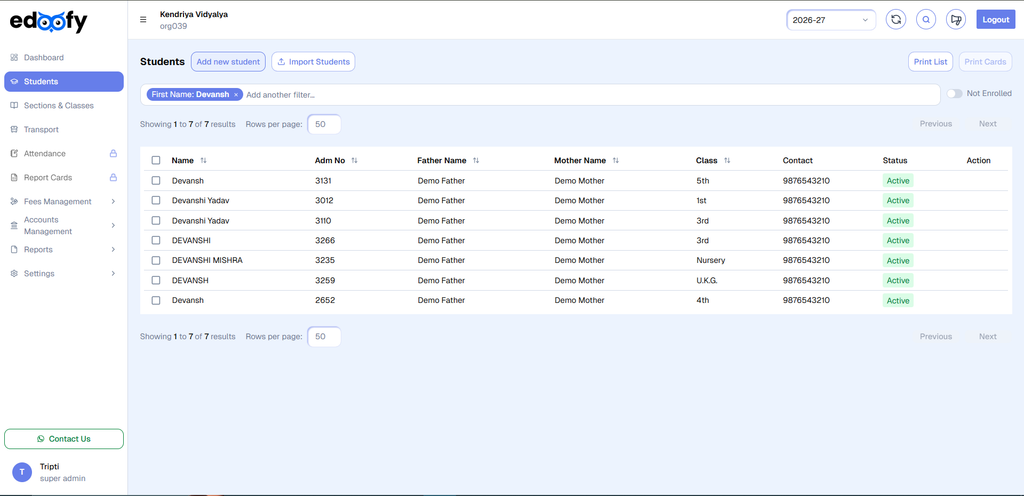
1. Apply Multi-Criteria Search Filters
- Navigate to the required module or report, such as Students, Fee Collection Report, Fee Due Report, Day Book Report, or Demand Report.
- Locate the search and filter input field at the top of the table.
- Click inside the field to view the available filtering criteria.
- Select the attribute you want to filter by. Available attributes depend on the selected module and may include the following:
- Student and Academic Information: First Name, Last Name, Admission No., Student ID, Class, Section, Roll No., Gender, Category, Caste, Bus No., Route, and House.
- Financial and Transaction Information: Status, Receipt ID, Type (Credit/Debit), Category, Payment Method, Bank Account, and Ledger Account.
- Enter or select the required value and press Enter to apply the filter. The selected condition appears as an active filter tag.
- To refine the results further, click the Add another filter… area and select an additional attribute with its corresponding value.
- Repeat the process to combine multiple conditions and narrow down the displayed records.
- To remove an individual condition, click the × icon on its corresponding filter tag.
The table updates according to the applied filters, helping administrators locate relevant records more efficiently.
2. Filter Records by Date Range and Numeric Values
2.1 Date Range Filter
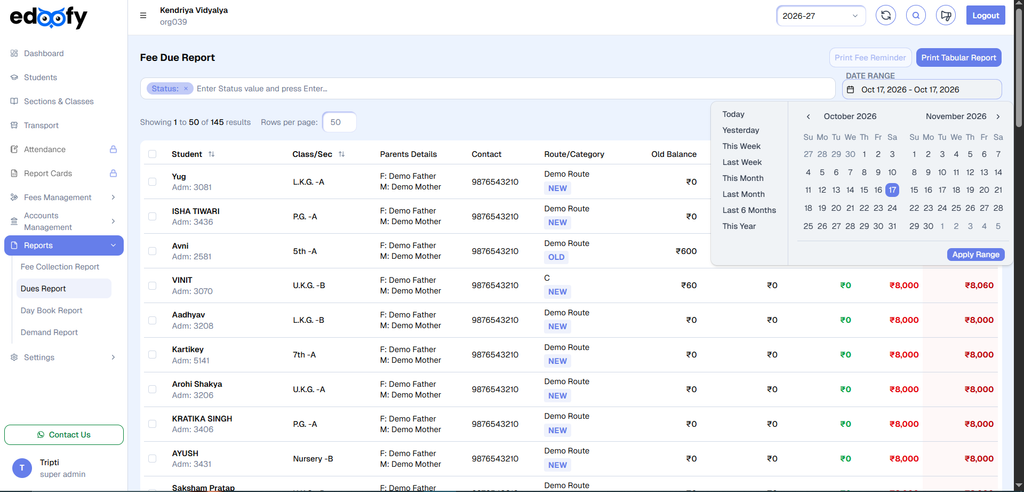
The Date Range filter allows administrators to view transactions and accounting records for a specific period in supported reports, such as Fee Collection, Day Book, and Fee Due Reports.
- Open the required report.
- Locate and click the Date Range button in the top-right toolbar.
- Select a predefined date range, such as Today, Yesterday, This Week, This Month, Last 6 Months, or This Year.
- Alternatively, select a custom start date and end date using the calendar.
- Click Apply Range to apply the selected period and refresh the displayed records.
The report then displays the records corresponding to the selected date range, subject to the other active filters.
2.2 Numeric and Percentage Range Sliders
Certain reports provide range sliders to filter records based on numeric values, balances, or other supported measurements.
- Locate the relevant range slider, such as Amount Range or Net Payable Range, where available.
- Adjust the minimum and maximum handles to define the required range.
- Review the updated table to identify records that fall within the selected range.
This feature helps administrators narrow down financial records without manually reviewing every entry.
3. Configure Table View and Pagination
The table display and pagination controls help administrators manage large datasets and navigate through filtered results.
- Locate the pagination controls associated with the table.
- Use the Rows per page dropdown to select the number of records displayed on each page, based on the available options.
- Click Next to view the following page of records.
- Click Previous to return to the preceding page.
- Continue navigating until you locate the required records.
Pagination allows administrators to review records in manageable groups while retaining the applied search and filter conditions.
4. Print or Export Filtered Results
After applying the required search criteria, administrators can print or export the displayed data for documentation, analysis, and record-keeping purposes.
4.1 Print Reports
- Apply the required filters and review the displayed records.
- Click the available Print or Print Tabular Report button.
- Review the generated print layout.
- Proceed with printing or save the report as a PDF if the print interface provides that option.
4.2 Export to Excel
- Apply the required search filters and date ranges, where applicable.
- Verify that the displayed records match the intended criteria.
- Click the Export Excel button.
- Download the generated spreadsheet and use it for further analysis or record-keeping.
The exported data should be checked against the intended reporting requirements before being shared or used for further processing.
Conclusion
The Filters and Searches feature simplifies record retrieval and report management in Edoofy School ERP. By combining search criteria, date ranges, numeric filters, pagination, and reporting actions, administrators can efficiently locate relevant student and financial records, review results, and prepare reports according to their requirements.


